Welcome to “Jak podłączyć taśmy LED: Przewodnik dla początkujących“! If you want to make your home brighter, we have colorful and efficient lights. LED Strip Lights are a modern twist on lighting. They’re eco-friendly and add flair to any space. Ready to give it a try? Please stick with me.
But wait, what’s involved in wiring these fantastic lights? If it sounds daunting, fear not. This guide is designed to walk beginners through every step of the process. This guide has information on LED Strip Lights. It explains what they are, why people like them, and how to use them safely. And yes, even if you’re new to this, it’s a DIY-friendly project!
A little about me—I’m Tom, an enthusiast of the LED lighting world since 2005. My journey in this field has been filled with learning and innovation. I made this guide to help you with wiring your LED Strip Lights and have a fun adventure.
So, are you excited to begin? This guide is your companion, whether aiming for a subtle glow or a splash of colors. Let’s dive right in and explore the potential of LED Strip Lights together. Your path to a more vibrant, energized home awaits!
Understanding the Basics
LED Strip Lights are a beacon of innovation and creativity in modern lighting. It’s essential to grasp the fundamentals to embark on this illuminating journey. This section will guide you through everything you need for LED Strip Lights.
Types of LED Strip Lights
Single Color
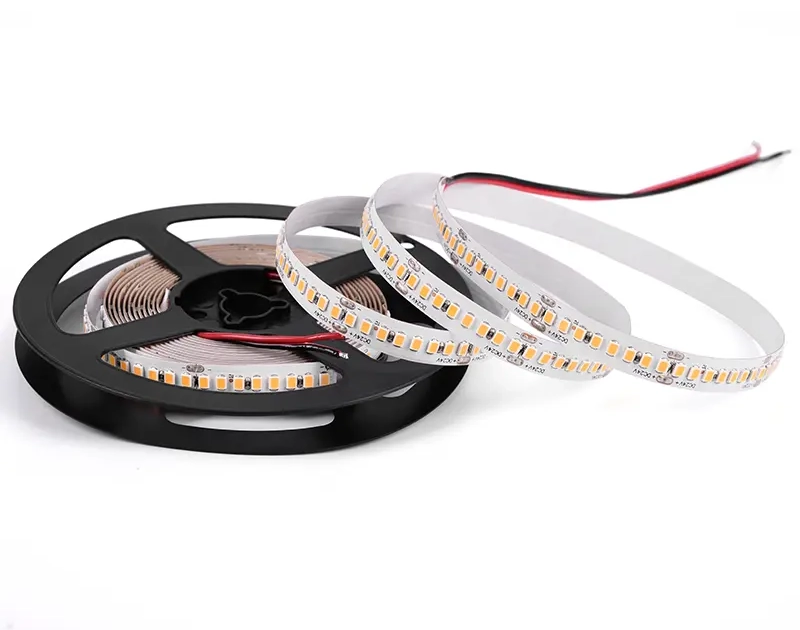
LED Strip Lights in a single color are simple and elegant, with timeless charm. These strips come in shades like warm white, cool white, blue, green, and red. They emit one solid color. Single color LED strips are popular for homes and commercial spaces. They can create a calm atmosphere or draw attention to a certain area.
RGB (Color Changing)
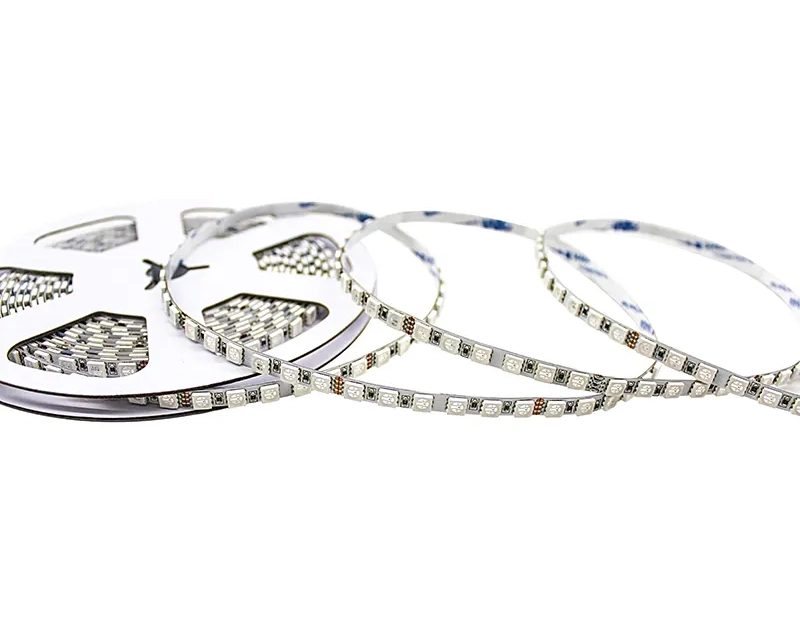
Ready to add a sprinkle of fun to your space? RGB LED Strip Lights (Red, Green, Blue) open doors to endless creativity. You can combine three colors to make many lovely shades that can enhance any room’s mood. RGB LED strips can change any room into a customized lighting experience. You can create a party vibe or a peaceful ambiance.
RGBW, RGBCCT, and More
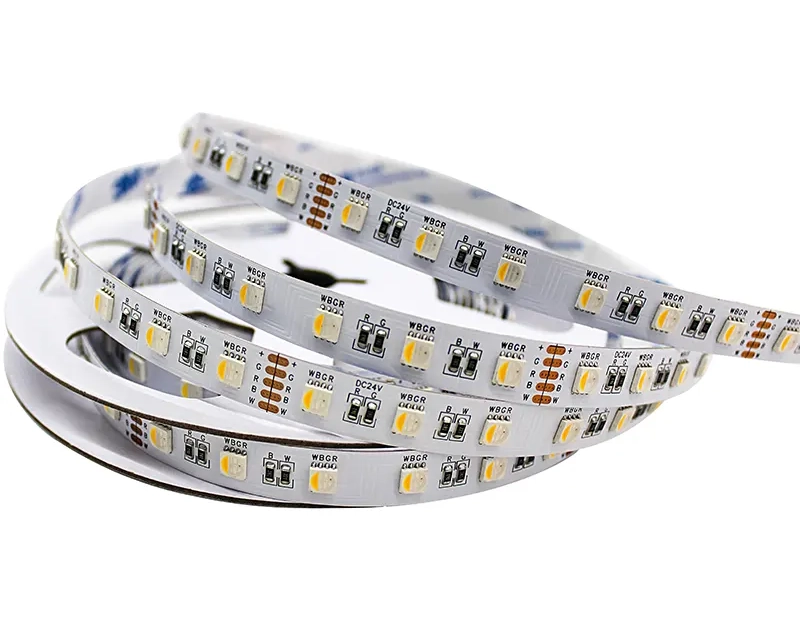
LED strip lights, such as RGBW and RGBCCT, provide many options for creative lighting. RGBW adds a pure white channel, allowing a fuller color spectrum and more nuanced control. To switch between cozy and energizing light, change the color temperature using RGBCCT. Dive into this advanced world; the sky’s the limit for your lighting designs!
Required Tools and Materials
Safety Equipment
Your safety is paramount, so pay attention to the essential safety equipment. Gloves keep your hands safe when you cut or handle things. Goggles protect your eyes from sparks or debris. To be safe, have a first aid kit nearby. Follow the product instructions carefully. Precaution is important. It’s the first step in any successful project, so remember that.
Wiring Tools
Wiring LED Strip Lights requires precision and the proper set of tools. To shape the strips, you need wire cutters and strippers. A soldering iron is also useful for making secure connections. Depending on your setup, you may also need heat guns, tapes, or connectors. When you buy good tools, your installation will last longer and the process will be easier.
Transformers, Receivers & Controllers
Last, the gadgets that bring your LED Strip Lights to life. Transformers regulate the voltage, ensuring it matches the LED strips’ requirements. Certain models allow you to adjust color, brightness, and patterns with receivers and controllers. It is important to choose the right accessories for your LED Strip Lights. The accessories should match the type of lights you have, such as single color or RGB. Compatibility is key. Choose the right transformers, receivers, and controllers to bring your vision to life.
Voltage Considerations and Connections
LED Strip Lighting is more than just choosing pretty colors or creative designs. A successful lighting project also demands meticulous attention to electrical details. To assess a display, you must understand voltage, transformers, connections, and connectors. Let’s explore these essential components in depth.
Understanding Voltage Drop
Voltage drop is a phenomenon that may sound complex, but its impact on LED Strip Lights is very tangible. Essentially, it’s the loss of electrical power strength over distance. LED Strip Lights can have uneven brightness, making some parts of the strip appear dimmer. To avoid this issue, choose the right wires of the right size and keep the power supply away from the lights. Understanding voltage drop helps keep your lights consistently glowing, highlighting your space beautifully.
Choosing the Right Transformer
To ensure your project succeeds, the LED Strip Lights require a functioning transformer. Check that the voltage matches your LED Strip Lights and meets the LEDs’ requirements. Using the wrong transformer can make the lights too dim or hurt them. Learn about your LED Strip Lights to find the brightness and durability you want. Then, choose a matching transformer.
P.S.: Please read this article on How to Choose LED Power Supply.
Wiring Fixtures in Parallel
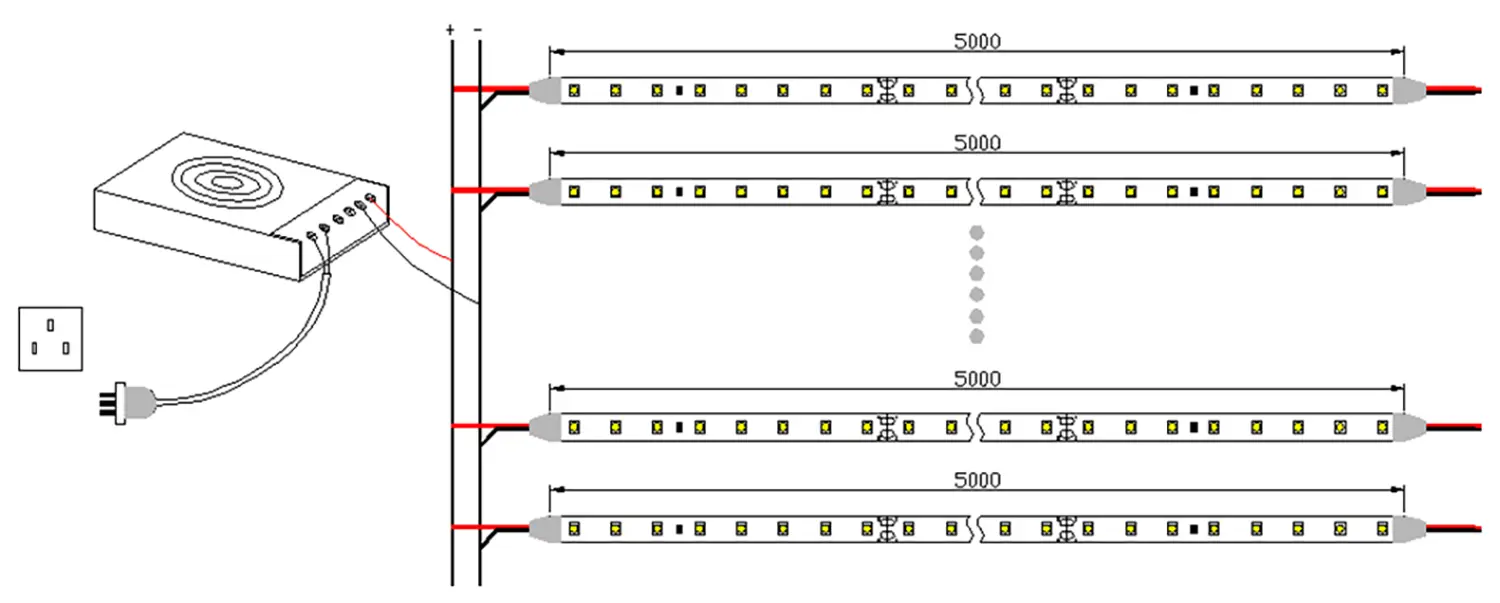
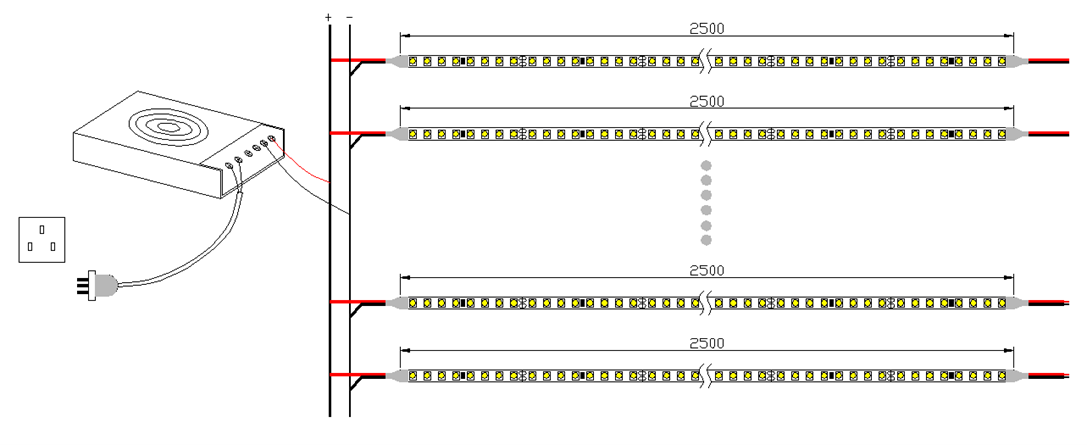
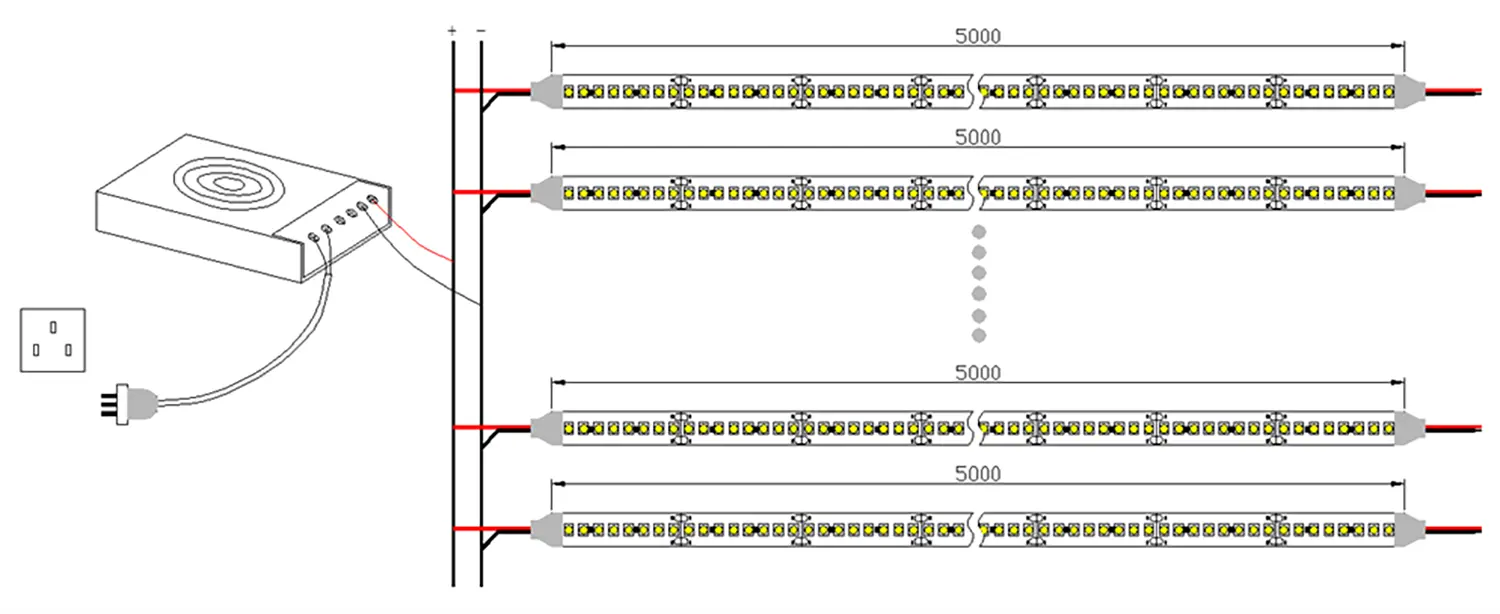
When it comes to LED Strip Lights, wiring them in parallel is the secret to achieving uniformity. Parallel wiring ensures a consistent voltage, while series wiring can have fluctuating voltage. All circuit parts get equal power, which makes the lighting even and steady. To make your kitchen or outdoor lighting look professional, learn how to wire lights in parallel.
Use of Wire Splitters and Correct Connectors
Wiring isn’t just about electrical connections but crafting a secure and easy-to-maintain system. Using the right tools for wiring makes the process easier and helps the project last longer. When you use the correct connectors, joints are more secure and less likely to come loose or fail. Wire splitters can help keep wires neat, especially when there are multiple strands. The right tools in your wiring toolkit can be unseen heroes for beautiful lighting in your space. When you invest in good parts, you create a strong base for a lighting project. The project will be attractive and last a long time, while also being safe.
Przygotowanie do instalacji
The allure of LED Strip Lights lies in their ability to blend technology with creativity. The transformation they bring to spaces is nothing short of magical. However, like all good magic, it requires meticulous preparation and attention to detail. In this section, we will explain how to install your LED lights. We will cover measuring, choosing a power supply, and planning the layout. This will make sure your lighting project looks great.
Measuring and Cutting the LED Strips
The adage, “Measure twice, cut once,” holds particular significance in LED Strip Lights. Measurement accuracy is the starting point for a professional and polished installation. LED Strips have cutting lines to keep each segment working properly. It is important to only cut at the designated lines to avoid irreversible damage. Utilize a quality measuring tape and mark your cutting points carefully. Taking a small step can set the tone for the whole project, making it feel custom-made for your space.
Selecting the Right Power Supply
The powerhouse behind the brilliance of LED Strip Lights is, of course, the power supply. It’s not just about plugging and playing. Make sure you use the correct power supply that matches the voltage and current needs of your strips. An improper match can lead to subpar performance, malfunctions, or irreparable damage. A good power supply makes sure your LED Strip Lights shine brightly in your chosen colors. Think of this selection as a kind of matchmaking. When the components work well together, it leads to great success.
Planning the Layout
Tips for Aesthetic Design
The installation of LED Strip Lights is where technology meets art. Designing the layout is not only about placement, but also about making it look good. Begin by drawing your design. Think about where the light will shine and how it will mix with what’s already there. Pick colors that go well with the area. Creating a harmonious environment takes vision and a thoughtful approach. Your LED lights are like brush strokes on a canvas, each contributing to a masterpiece.
Avoiding Common Mistakes
Even with the best of intentions, mistakes can happen. Knowing what to watch out for can save you time, money, and frustration. Sharp turns can damage the circuits. Overloading one circuit can cause it to fail. Using mismatched parts can ruin the whole system. These problems are not just annoyances; they can get in the way of your creative ideas. To prevent these mistakes, you must have knowledge, plan well, and commit to doing things right. Taking care of each detail brings us closer to creating an LED lighting display. This display not only brightens a space but also makes it extraordinary.
Different Types of LED Strip Wiring
If you have the right tools and know-how, installing LED strip lights can be fun and creative. Different types of LED strip lights need unique wiring considerations. Let’s break down each type and provide guidance on how to wire them effectively. This section has everything you need to light up a room with one color or make a fun light display.
Wiring Single Color LED Strip Lights
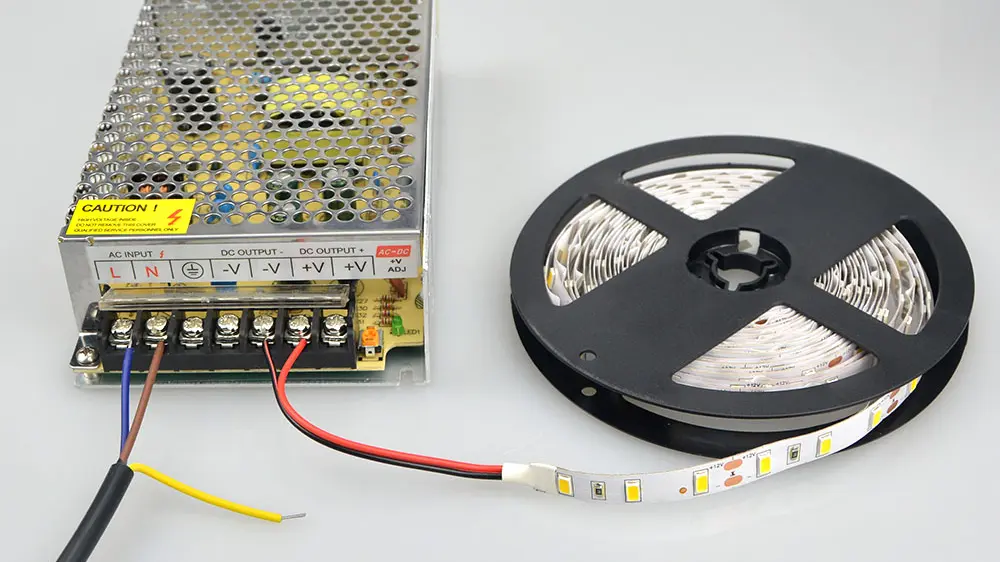
The elegance of a single-color LED Strip Light installation lies in its simplicity. The wiring process for these lights is as straightforward as it gets. Refer to the LED light wiring diagram above: First, connect the power supply to the transformer. Then, connect the transformer to the receiver. Finally, wire the LED Strip. This linear flow creates a harmonious and consistent light source. If you want a simple and modern design, this process creates a consistent look that fits in with any style.
Wiring Tunable White LED Strip Lights
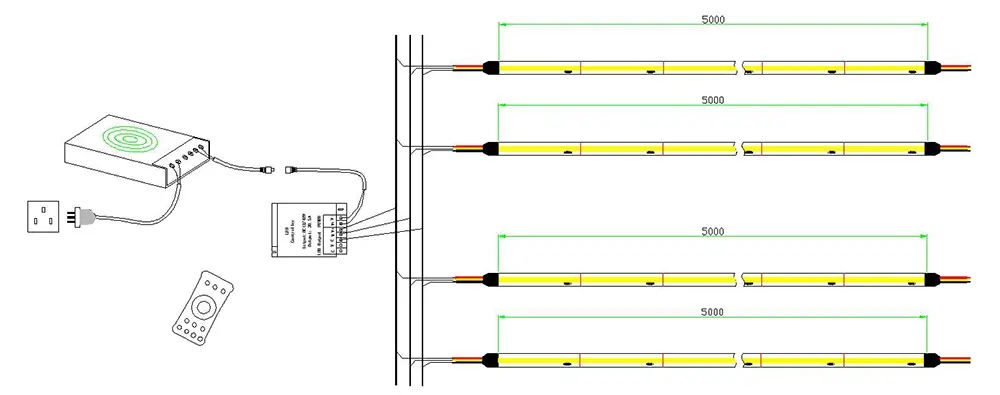
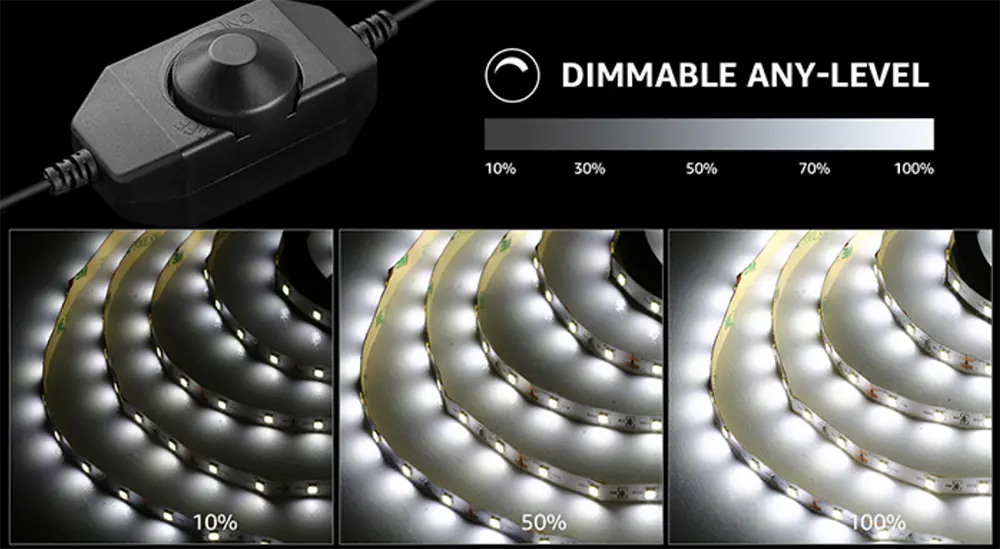
You can control the brightness of tunable white LED strip lights. To achieve this, you can refer to the LED strip light wiring diagram above. You can change the lighting to match your mood or the time of day with this special feature. It’s an intelligent way to blend technology with aesthetics.
Wiring RGB LED Strip Lights
If an array of colors is what you’re aiming for, RGB LED Strip Lights are your go-to. To install these lights, you connect them to color controllers for customization. These colorful lights can create various moods and make regular spaces visually appealing. Designers and people who like doing projects themselves love RGB LED strip lights. They can easily pick and switch colors.
Wiring RGBW LED Strip Lights
RGBW LED Strip Lights take the creativity a notch higher by adding white light to the colorful RGB mix. They need special controllers and wiring to achieve the perfect blend of colors. You can change how the light looks and make it feel different by designing the lighting.
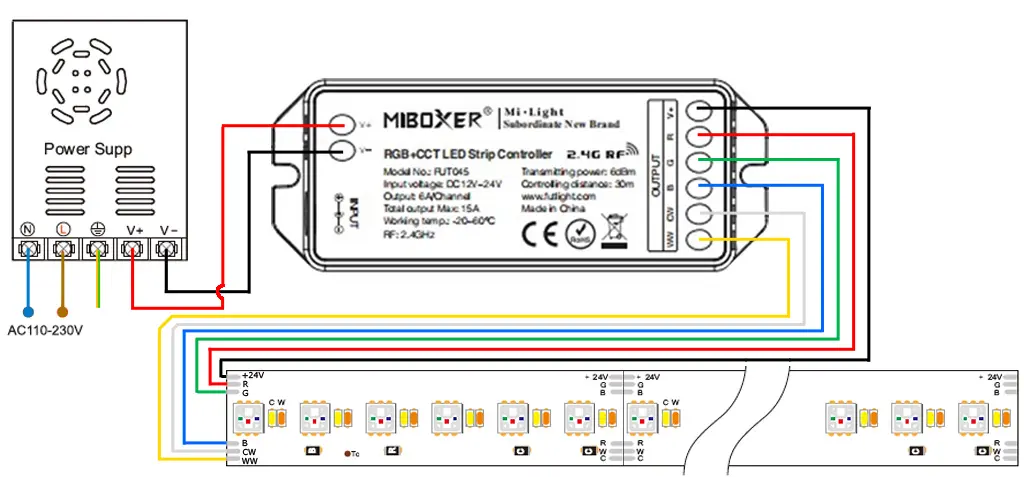
Wiring RGBCCT LED Strip Light
RGBCCT (Red, Green, Blue, Cool White, and Warm White) adds temperature control to the mix. A controller connects the wiring. The controller can adjust the color temperature. You can use this feature to control the atmosphere and make it warm or cool as you want. It’s a refined way to personalize your space.
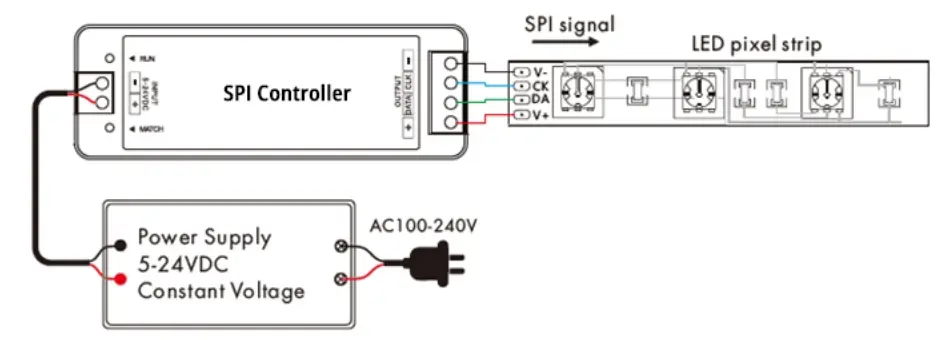
Wiring Addressable LED Strip Lights
Addressable LED Strip Lights are a marvel in the world of lighting design. You can control each LED separately with these lights. To do this, you need to wire them carefully, including data transmission lines. Use this feature to make detailed designs and interactive experiences more creative. Addressable LED strip lights can create a ripple effect or a pulsating dance floor. They open up a world of imagination.
Step-by-Step Wiring Guide
When it comes to wiring LED strip lights, the process might seem daunting to those new to the field. But you can make your creative vision a reality by being careful and understanding the steps. This guide will help you wire your room and turn a dark corner into a bright masterpiece.
Safety First – Precautions and Setup
Before you even pick up a tool, it’s vital to prioritize safety. To avoid injuries and mistakes, begin the project cautiously and prepare properly.
1. Turn off the power: Ensure that the power is completely turned off to avoid accidental shocks. This simple step lays the foundation for a safe work environment.
2. Use proper tools: To stay safe, wear gloves, goggles, and use insulated tools for extra protection. Safety is paramount; investing in the right equipment can make a significant difference.
3. Read instructions: Before you start, make sure to carefully read the instructions for each LED strip you receive. To avoid mistakes and follow the right way, learn about these things.
Connecting to Power
Making the first power connection is important and needs careful attention to detail.
1. Connect the strips to the power source: You need to choose a transformer that matches the voltage of your LED strip lights. Then, connect the transformer to your power source. Careful connection avoids any unwanted electrical issues.
2. Ensure proper power flow: Before proceeding, it is smart to check the connections with a multimeter or tool to confirm the power flow. This ensures that everything is in working order before you proceed.
Attaching the LED Strips
Once the power is set up, it’s time to position the LED strips.
1. Place the strips in the desired layout: Depending on your design, lay out the strips in the pattern you want. This is where your creativity shines, so take your time to get it right.
2. Choose correct adhesive or lips: To make sure the LED strips stay in place, choose the correct adhesive or clips for the surface and strip type. Secure attachment is essential for both aesthetics and functionality.
Soldering and Wiring
To finish this stage smoothly, you need more technical expertise. But, if you are patient, it can still be done.
1. Soldering: If you need to solder, use a soldering iron to make secure connections. Soldering can provide a more durable and clean-looking finish.
2. Secure and insulated: Make sure wires are secure and insulated properly. This prevents short circuits and looks good.
Testing and Troubleshooting
Finally, it’s time to bring your project to life and handle any unexpected issues.
What If It Doesn’t Work?
1. Check all connections: If something isn’t lighting up as you expect, begin by examining all connections. A loose wire or an incorrect connection can often be the culprit.
2. Verify voltage and power supply compatibility: Check that the power supply is compatible with your LED strips. A mismatch can lead to a need for more functionality.
3. Consult a professional if needed: If all else fails and the solution isn’t apparent, seek professional assistance. Sometimes, an expert eye can quickly identify and fix the problem.
Advanced Considerations and Options
LED strip lighting allows you to make unique and creative lighting settings. But, to get the best results, we must deal with some complex issues that come with these opportunities. In this part, we’ll look at the detailed parts of LED strip lighting and how to use them to your advantage.
Dimmer and Controller Options for LEDs
LED strips have the remarkable capability of working with various dimmers and controllers. You can adjust your lighting to match different moods, events, or preferences.
1. Understanding Dimmer Compatibility: Not all LED strips are compatible with every dimmer. Understanding your LED strips’ specifications will help you select the suitable dimmer. Make sure to check the voltage requirements and compatibility with specific LED models.
2. Choosing the Right Controllers: Controllers enable you to manipulate color, brightness, and patterns. Choosing the right controller for your system gives you creative and functional options. There are controllers with smartphone integration, remote controls, and even voice command capabilities.
3. Customized Experience: With the right combination of dimmers and controllers, your lighting environment becomes more than mere illumination. You can shape it to show emotions, beauty, or usefulness, and make it interactive.
Crossed Connections and How to Avoid Them
When dealing with complex wiring, crossed connections are a big problem. They can cause chaos in the whole system. Here’s how you can avoid this common but serious problem:
1. Proper Planning: To avoid confusion, plan the wiring design ahead of time. This will ensure clarity and prevent crossed connections.
2. Correct Wiring Techniques: For reliable connections, use proper tools and follow wiring best practices. This includes color-coding, labeling, and regular inspections during installation.
3. Attention to Detail: To save time and money later, it’s important to be careful and thorough in your work. Double-check everything as you go. A seemingly minor mistake can lead to significant damage if not identified early.
Creative Ideas and Inspiration
LED strip lights offer a plethora of opportunities for creativity and innovation. If you’re an interior designer or a homeowner, here are some ideas to change your living area.
How to Use LED Strip Lights in Different Rooms
LED strips can genuinely revolutionize a room’s ambiance. You can try different effects in different spaces because these lights are versatile.
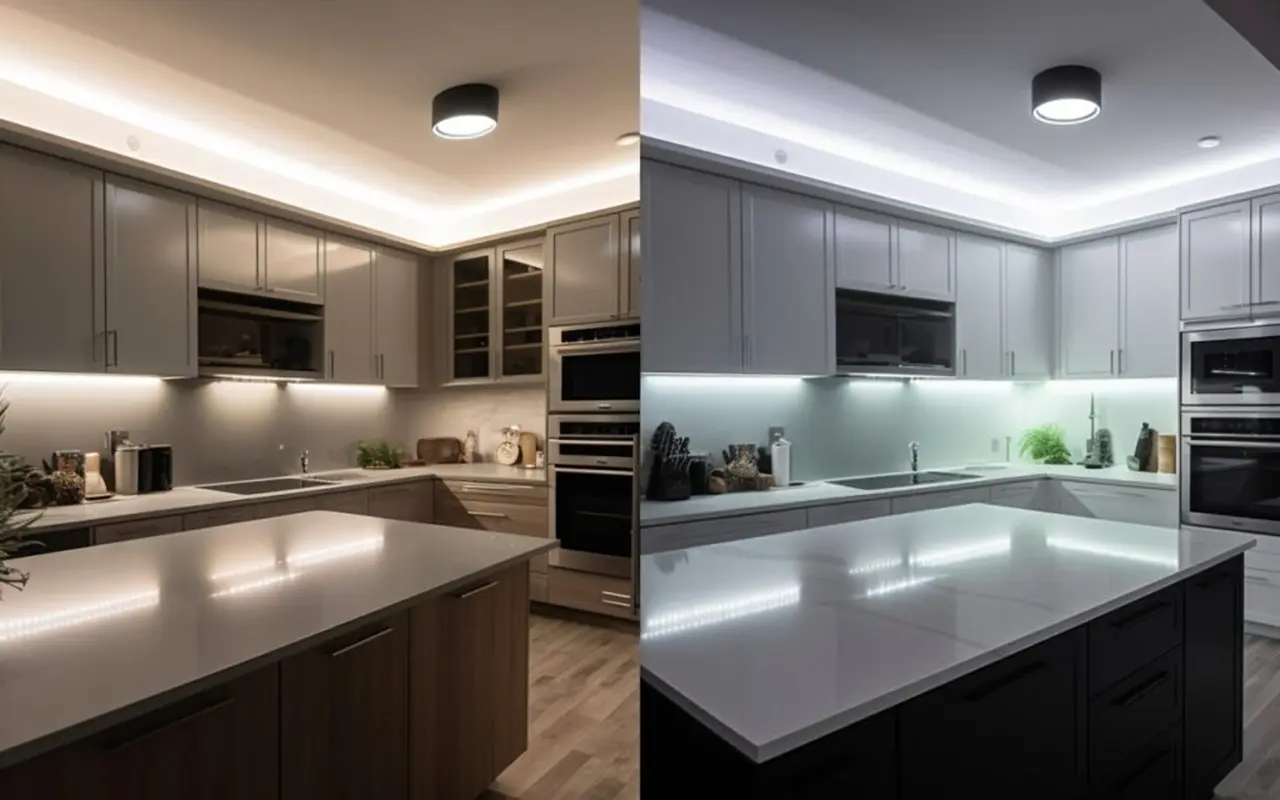
1. Kitchens: Use LED strips under cabinets for a modern and functional touch. Choosing the right color temperature can make cooking more enjoyable and improve appearance.
2. Bedrooms: LED strips behind headboards or around mirrors create a calming, intimate atmosphere. Experiment with colors to find what soothes or energizes you.
3. Living Rooms: To make your living room elegant and inviting, place LED strips strategically. Put them around entertainment systems, bookshelves, or art pieces.
4. Outdoor Spaces: Extend creativity to patios, gardens, or pools using waterproof LED strip lights. They can turn an ordinary outdoor space into a lively entertainment area.
P.S.: We have separate articles about the ideas of using LED strips. Check below please:
37 LED Strip Ideas to Transform Your Bedroom Ambiance
Najlepsze pomysły na taśmy LED: 43 niesamowicie fajne sposoby wykorzystania taśm LED
Combining with Other Lighting Types
LED strip lights don’t have to stand alone. To enhance your lighting design, blend traditional lighting with depth, texture, and layers.
1. Layering with Ambient Lighting: To create a more interesting look, combine LED strips with ceiling lights or wall sconces.
2. Mixing with Task Lighting: In workspaces, kitchens, or study areas, combining LED strips with task lights improves function and appearance.Mixing with Task Lighting
3. Creating Dramatic Effects with Accent Lighting: LED strips can highlight architectural features or artwork. Other accent lights create depth and shadow, making the visual experience more dynamic.
4. Sustainability Consideration: LED strip lights are energy-efficient and can be a sustainable addition to traditional lighting systems, reducing energy consumption without compromising beauty and functionality.
The world of LED strip lights is rich with possibilities. When you improve your system, remember important factors and look for creative ideas to customize spaces. No matter if you’re an expert or a DIY enthusiast, these insights will help you bring your lighting visions to life.
Maintaining Your LED Strip Lights
Taking care of LED strip lights involves more than just making sure they keep working. It’s also important to protect their appearance and effectiveness. Taking good care of these versatile lights can make them stay bright and reliable for a long time. In this section, we will discuss how to take care of your LED strip lights. This involves cleaning, maintaining, and knowing when to replace them.
Cleaning and Upkeep
Just like the rest of your home or office, LED strips need regular cleaning to stay shiny and work well. However, cleaning these delicate products requires more than a random wipe-down. Here’s a comprehensive guide to keeping your LED strip lights in top condition:
1. Choosing the Right Tools: To clean LED strips, use a soft cloth, like microfiber. This material won’t scratch or damage the surface.
2. Selecting a Suitable Cleaner: To choose a good cleaner for LEDs, pick one that is mild and does not have harsh chemicals. A simple water and gentle dish soap mixture can often be effective.
3. Avoiding Water: To prevent issues, don’t expose LED strips to water, even if they’re waterproof. Always dampen the cloth rather than applying water directly to the LED strips.
4. Cleaning Technique: To prevent streaks and damage, wipe gently in a consistent direction when cleaning. It’s important to be gentle. Rubbing too hard can damage the LEDs or the protective coating.
5. Frequency of Cleaning: Regular cleaning is vital, but how often depends on the location and usage of the LED strips. More frequent cleaning may be required in a kitchen or other high-traffic areas.
6. Consideration for Outdoor LED Strips: Outdoor strips may require special attention, including checking for weather-related wear and tear. Following the manufacturer’s instructions for outdoor cleaning and maintenance is crucial.
When to Replace LED Strip Lights
LED strip lights are known for longevity, but even the best products have a lifespan. To keep your lighting in good condition, pay attention to signs of wear and replace them when needed.
1. Diminished Brightness: Consider a replacement if the LED strips lose their brightness or appear dull. Diminished brightness could be a sign of aging or internal damage.
2. Color Inconsistency: LEDs may show inconsistent colors over time. If recalibration doesn’t resolve the issue, it might indicate that the LEDs are nearing the end of their useful life.
3. Physical Damage: Any noticeable damage, such as cracks or broken sections, is a clear sign that replacement is necessary. Physical damage can not only affect appearance but also lead to safety concerns.
4. Flickering or Intermittent Failure: These signs may indicate internal problems that can’t be repaired. Though sometimes the issue might be with the power supply or connections, replacement is likely the next step if those are ruled out.
5. Energy Efficiency Consideration: Older LED strips may be less energy-efficient than newer models. Upgrading to a more advanced version could save energy costs in the long run.
6. Compliance with the Latest Standards: Technology evolves, and so do safety and performance standards. Keeping up with the latest industry standards by replacing outdated LED strips can be essential to maintaining a safe and efficient lighting system.
Najczęściej zadawane pytania
What are the 4 wires on the RGB LED strip?
An RGB LED strip usually has 4 wires. These wires represent the primary colors (Red, Green, and Blue) and a common ground or power wire. Combining these colors in different intensities can achieve a wide range of colors.
How do you run multiple LED strip lights?
To run multiple LED strip lights, connect them in parallel to a suitable power supply. You can use connectors or soldering to achieve this. Ensure that the power supply can handle the total current draw of all the connected strips.
Can you splice LED light strips together?
LED strip lights can be spliced together using connectors or soldering. For the best results, align the connections properly and follow the manufacturer’s instructions.
Is it better to wire LEDs in series or parallel?
LED strip lights perform better when wired in parallel, as this allows each strip to draw power on its own. Wiring in series can create voltage drop issues, leading to inconsistent brightness.
How do I connect multiple LED strip lights to my power supply?
To connect many LED strips to a power supply, find the total voltage and current needed. To connect the strips, use a power supply that meets the specifications. Connect them in parallel with suitable connectors or soldering techniques.
What power supply do I need for LED strip lights?
LED strip lights require a power supply that matches their voltage and current needs. When searching for a power supply, find one that meets these requirements. Make sure it has some extra capacity for safety and efficiency.
Do all LED strip lights need a transformer?
Most LED strip lights need a transformer to change the household voltage for the LEDs. To find out what your strip lights need, look at the instructions from the manufacturer.
Can you wire LED strip lights to a switch?
Yes, you can wire LED strip lights to a switch to easily control turning them on and off. To follow the usual way of wiring, connect the switch between the power supply and the LED strips.
What are the 3 wires on tunable white LED strip lights?
Tunable white LED strip lights have 3 wires: positive, negative, and a data line for color control. You can change the white color to create different moods or effects.
How can I creatively combine LED strip lights with other lighting types?
Blending LED strips with traditional lighting can create unique effects. Make your lighting design more exciting by using different colors, patterns, and positions with other lights.
Wnioski
As we finish this detailed guide on LED strip lights, let’s review the important points. We also want to encourage you to try new things and share your thoughts and projects with us. Lighting does more than just provide light. It also sets the mood, enhances spaces, and creates atmosphere. With LED strip lights, these possibilities are boundless.
Wiring and installing LED Strip Lights can be rewarding and exciting DIY projects. This lighting option requires precision, creativity, and understanding its many facets. Here’s a quick summary of what we’ve covered:
1. Preparation and Planning: From measuring and cutting the LED strips to selecting the proper power supply, laying the groundwork is crucial.
2. Different Types of Wiring: Understanding the specific wiring needs for various LED strip lights ensures a flawless installation.
3. Step-by-Step Wiring Guide: Safety first, followed by systematic connections and testing, creates a smooth setup process.
4. Advanced Considerations: Dimmers, controllers, and avoiding crossed connections all contribute to a more advanced and customized lighting experience.
5. Creative Ideas: Inspiration for using LED strip lights in different rooms and combination with other lighting types opens up a world of creative opportunities.
6. Maintenance and Upkeep: Proper cleaning and knowing when to replace the LED strip lights ensures they function optimally.
To learn and feel more confident about using LED strip lighting, focus on these key points.
LED strip lights are a canvas for creativity. There’s no one-size-fits-all approach; the fun is often found in experimentation. You have many options for creating the right atmosphere in each area of your home.
1. Play with Colors and Patterns: LED strip lights offer various color options and patterns. Experimenting with these can lead to unique and personalized effects.
2. Combine with Existing Lighting: Don’t hesitate to blend LED strips with traditional lighting. Such fusion can bring depth and innovation to your design.
3. Experiment with Controllers: Playing with different control options can help you find the perfect lighting mood, from dimmers to color controllers.
Remember, the process is as enjoyable as the result. Embrace the journey of experimentation and creativity.
Choosing the right partner makes all the difference when lighting up your space. Unitop is a leading manufacturer in China for Taśmy LED oraz Elastyczny neon LED. We offer high-quality products and innovative designs. Our passion for lighting and commitment to excellence ensures you get the best. Are you curious about what LED lighting can do for your home or business? Do you have specific needs or questions? Skontaktuj się z nami right away. When you choose Unitop, you’re not just getting lights. You’re getting a reliable LED brand. Let’s light up your world together with Unitop.

Tom jest obecnie kierownikiem sprzedaży w Unitop (China) Co., Limited. Był w Oświetlenie LED od 2005 roku. Jest ekspertem w dziedzinie sprzedaży i marketingu oraz zarządzania fabryką. Lubi kulturystykę, a także jest szalonym fanem Apple! Jest ciężko pracującym facetem i uwielbia uczyć się i próbować nowych rzeczy.
E-mail: tom@unitopledstrip.com WhatsApp: +86-18680307140





Dodaj komentarz
Chcesz się przyłączyć do dyskusji?Zapraszamy do udziału!